


什么是二次排序
待排序的数据具有多个字段,首先对第一个字段排序,再对第一字段相同的行按照第二字段排序,第二次排序不破坏第一次排序的结果,这个过程就称为二次排序。
如何在mapreduce中实现二次排序
mapreduce的工作原理
MR的工作原理如下图(如果看不清可右键新标签页查看):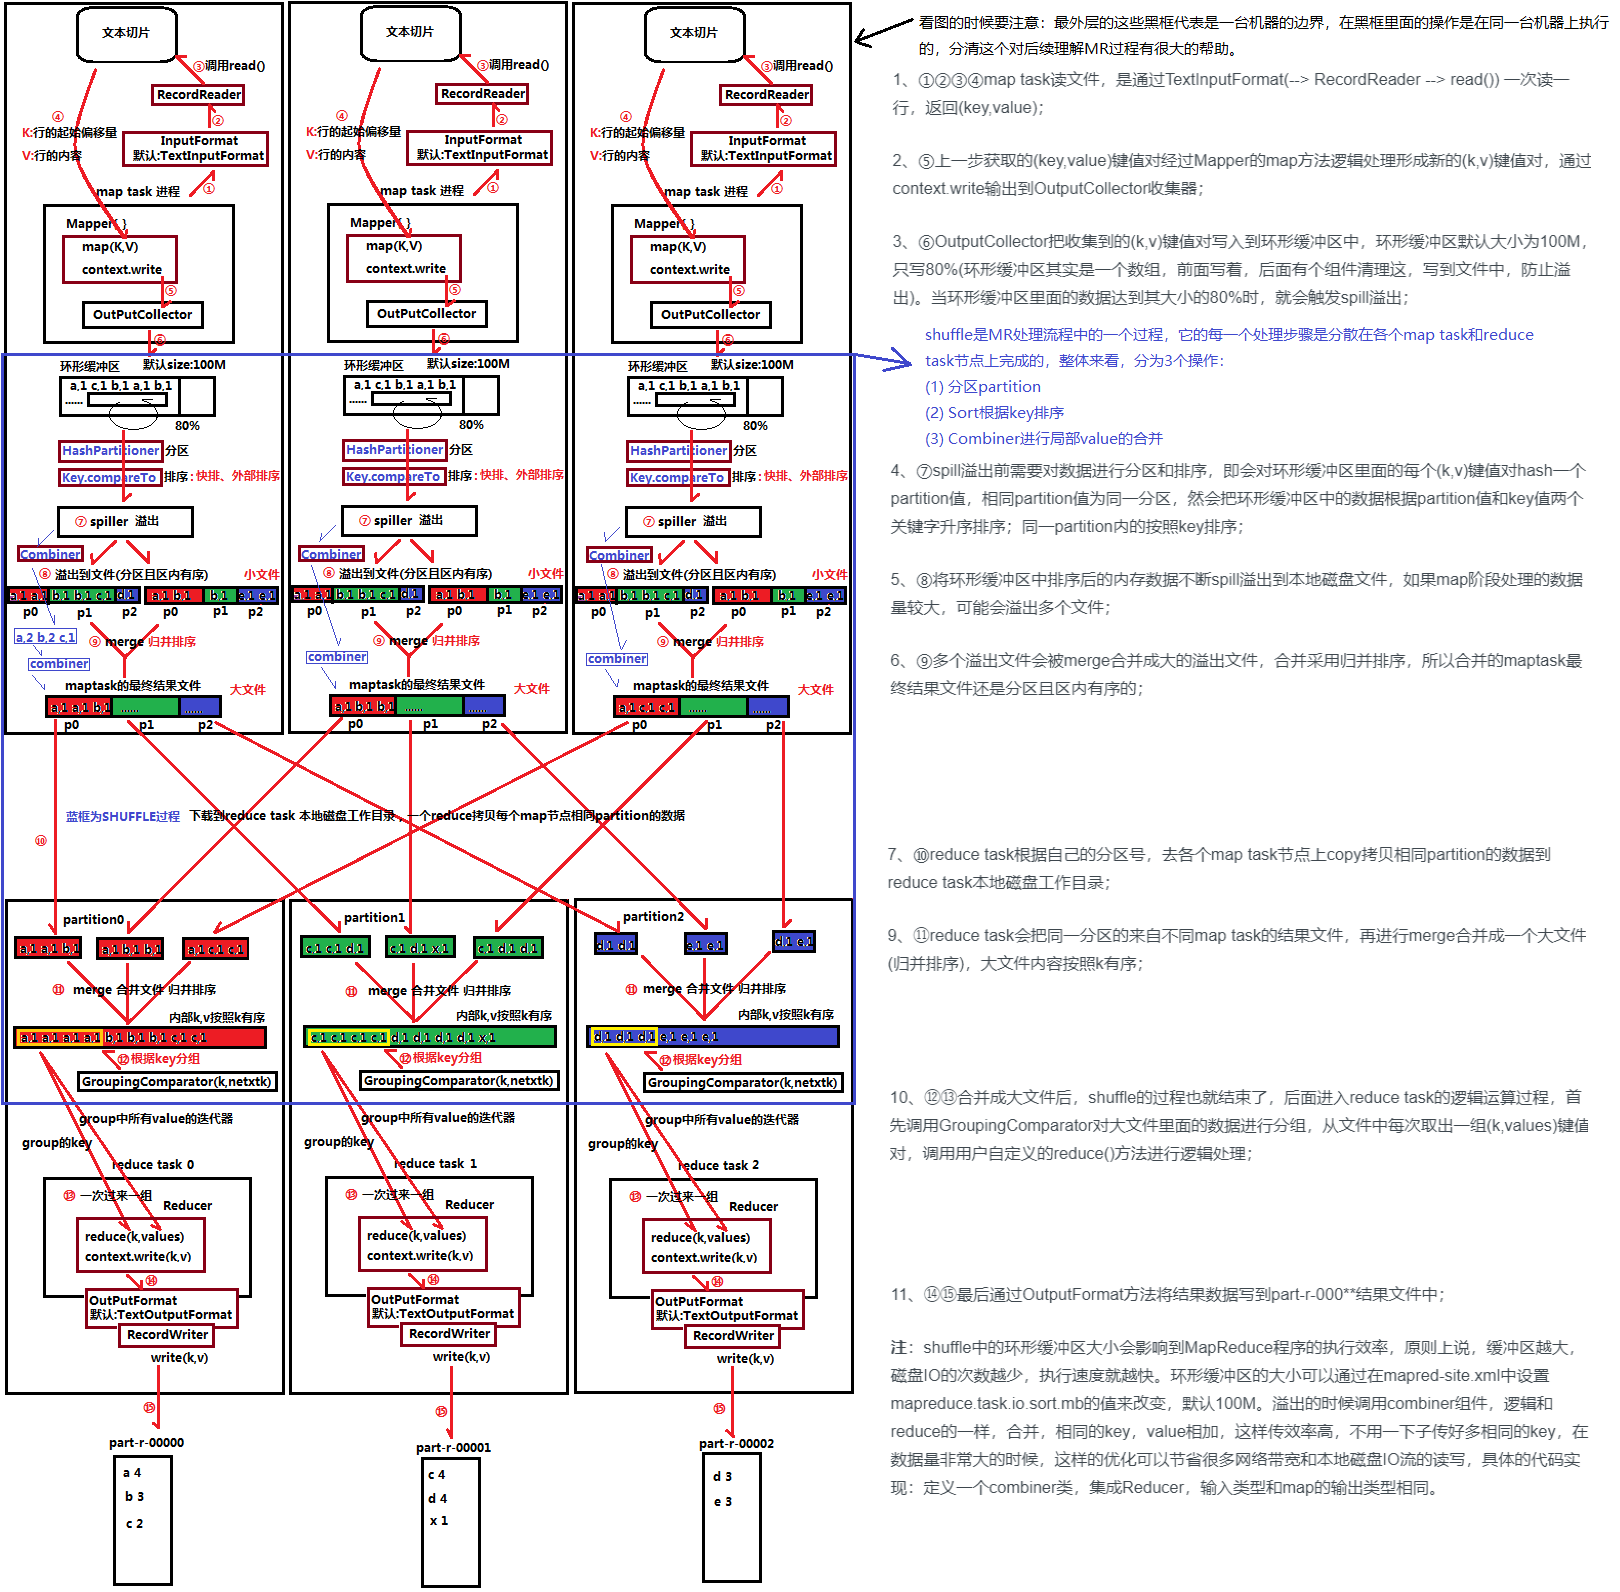
还可以参考博文: MapReduce运行机制,MapReduce中Shuffle机制详解——Map端Shuffle,MapReduce中Shuffle机制详解——Reduce端Shuffle来理解mapreduce的运行机制以及shuffle的过程。
注意:因为map分区是按key分区的,而且分区数跟reduce数对应,所以相同的key只会在一个区并且只会交给一个reduce,因此上面图片中的一些结果数据不正确,我们主要理解过程即可。
示例数据以及需求
二次排序输入
7 5-9999 13 95-9999 52 71 24 624 132 991 87 8888
二次排序输出、
-------------------------------------------------9999 1-9999 5------------------------------------------------1 21 8------------------------------------------------2 72 99------------------------------------------------3 95------------------------------------------------4 134 62------------------------------------------------7 57 8888
可以看到这就是一个二次排序的过程。
思路一:简单粗暴版
假设每一行以空格划分的两个Int型数据分别为Int1、Int2,那么最简单的思路是:Mapper以每一行数据作为输入,输出键值对为
现在来分析一下,在这个思路下,一个Reducer要接收一个给定Key的所有值并对其进行内部排序,如果数据量大的话,那显然这会耗尽机器的内存,对于实际运用,这是不可取的思路。
思路二:进阶版
仔细观察MR的原理图就可以发现,MR的分区、排序、分组等操作都是针对Key进行的,既然我们想要对两个字段都进行排序,那么可以将Int1和Int2组合成新的Key,原来的Value保持不变(不过这时候Value其实都不重要了,因为Key就包含了原来键值对的所有信息了,所以Value其实也可以设置为Null,这里就选择保持Value不变的方式进行操作),这样一来按照MR的原理图来看,对于新Key:
- 其分区逻辑为:只对Int1进行分区(默认的分区操作是以整个Key进行哈希操作的,这就可能把有同样Int1的组合Key发送给不同的Reducer,这显然不是我们想要的);
- 其排序逻辑为:先对Int1排序,在Int1相同的基础上对Int2排序(即是二次排序的逻辑);
- 其分组逻辑为:只对Int1进行分组(默认的分组操作是相同的Key才会被分到同一个组,这里只对Int1分组就可保证与原逻辑一致,使得Int1相同的数据可以在一次reduce函数被调用时一同被处理)。
下面开始讲解要实现的代码。
一、自定义组合Key
在MR中,所有的Key值类型都必须实现WritableComparable接口,使其支持可序列化(用于写入磁盘)和可比较(用于排序)。
- 要是可序列化的就得实现readFiels()和write()这两个序列化和反序列化函数
- 要是可比较的就得实现compareTo()函数,该函数即是排序规则的实现
/*** 构造key,因为这里重新写了比较方法,并且分区的时候是按key来分区的,所以需要重写分区,按first来分区,否则会错乱* @author forever**/public class IntPair implements WritableComparable<IntPair>{//第一位private int first = 0;//第二位private int second = 0;public int getFirst() {return first;}public void setFirst(int first) {this.first = first;}public int getSecond() {return second;}public void setSecond(int second) {this.second = second;}@Overridepublic void readFields(DataInput in) throws IOException {first = in.readInt();second = in.readInt();}@Overridepublic void write(DataOutput out) throws IOException {out.writeInt(first);out.writeInt(second);}/*** 比较,先第一位比较,再第二位比较*/@Overridepublic int compareTo(IntPair other) {if(first!=other.first) {return first<other.first?-1:1;}else if(second!=other.second) {return second<other.second?-1:1;}else {return 0;}}}
关于Key排序的规则,hadoop中依次判断如下:
- 如果调用job的setSortComparatorClass()设置的mapred.output.key.comparator.class对应的comparator
- 否则,使用key已经登记的comparator
否则,实现接口WritableComparable的compareTo()函数来操作
这里由于在实现组合Key类的时候必须重载实现compareTo函数,而由于它和setSortComparatorClass都是为了给分区时的排序或者归并的时候定义Key排序的规则的,所以既然有了前者了,那后者就也可以不用实现了。
但是值得思考的是,如果在每次我们自定义Key类的时候都要重载实现compareTo函数,那么为什么还要有setSortComparator的存在呢?
在下面第三部分讲分组逻辑的实现时就有讨论相关的问题,这里笔者认为相比自定义Key类的compareTo函数,setSortComparator设置的comparator如果是用RawComparator实现的话,那么后者是基于直接在字节上进行比较的操作(不用反序列化),而前者还需要反序列化后再进行比较,显然后者的实现效率要高一点。所以如果要追求Key值间的更高效率的比较的话,就有了后者存在的意义了。
这里再思考一个问题,上面讲到 “在MR中,所有的Key值类型都必须实现WritableComparable接口,使其支持可序列化(用于写入磁盘)和可比较(用于排序)”,但是其实java本身就实现了序列化机制,那么为什么hadoop不直接用而是要引入一个Writable接口呢?
既然hadoop不用,那肯定是有它的原理的(废话)。那就要来看看hadoop对序列化的需求是怎样的以及java本身的序列化到底有什么缺点。
- hadoop对序列化的需求:hadoop在集群之间在进行节点间的通讯(使用RPC调用)、存储数据的时候,都需要序列化,而且要求序列化要快,且体积要小,占用带宽要小。
java本身的序列化计算量开销大,且序列化的结果体积大太,有时能达到对象大小的数倍乃至十倍。它的引用机制也会导致大文件不能分割的问题。(这显然就不适合hadoop了)
关于Writable和WritableComparable的区别可参考:Hadoop中Writable和WritableComparable区别
二、实现组合Key的分区逻辑
这里有两种实现方式,实现其一就可以实现目的。
实现方式一:自定义分区类
/*** 因为key变了,所以这里要重新定义分区* @author forever**/public class FirstPartitioner extends Partitioner<IntPair, IntWritable> {@Overridepublic int getPartition(IntPair key, IntWritable arg1, int numPartitions) {//因为这里直接是整形,所以直接取模即可return Math.abs(key.getFirst() % numPartitions);}}
由于分区只针对Int1,所以这里进行哈希时只使用到了Key.getFirst()。由于分区的标号只能是0到numPartitions-1的整数,所以getPartition()函数中就要个取模操作。同时为了保证分区的结果为正,这里最后要取最绝对值。如果不在0到numPartitions-1范围内就会报Illegal partition的错误。
这样在通过添加 job.setPartitionerClass(FirstPartitioner.class); 就可以实现设置了。
实现方式二:重载组合Key的hashCode()函数以及equals()函数
以下代码在组合Key——IntPair中实现。
@Overridepublic int hashCode() {return first;}@Overridepublic boolean equals(Object other) {if (other instanceof IntPair) {IntPair o = (IntPair) other;return o.first == first && o.second == second;} else {return false;}}
在Java中hashCode()函数和equals函数基本上是成对实现的,关于hashCode()函数的设计方式可参考:hashCode 方法及 equals 方法的规范,一般对于Int型数据,其哈希值就是其本来的值,所以这里直接返回first而不需要进行什么乘法或取模运算。
若选择用这种方式实现,则默认使用HashPartitioner作为分区类,这里组合键实现的hashCode()函数就在这里被调用了。
HashPartitioner
public class HashPartitioner<K2, V2> implements Partitioner<K2, V2> {public void configure(JobConf job) {}/** Use {@link Object#hashCode()} to partition. */public int getPartition(K2 key, V2 value,int numReduceTasks) {return (key.hashCode() & Integer.MAX_VALUE) % numReduceTasks;}}
关于为什么要将key的哈希值和Int最大值相与可参考:what does that mean for Text.hashCode() & Interger.MAX_VALUE?
其实仔细观察后就可以发现上面这两种方式最后得到的结果都是相同的。
但是这里有个小问题:感觉equals函数在整个过程中貌似没有用上,就算去掉这个函数,程序还是能不报错执行,不过看网上很多关于二次排序的博客文章都提到要实现这个函数,这里我的理解是,除非我们确实需要用到Key的equals函数,否则在这篇范围内是可以不用实现它的,而网上的许多关于二次排序的文章中其实也没有用到这个函数。但是貌似hashcode和equals这两个函数经常是成对出现的,为了保险起见,重载实现一下也无妨。
注意点:默认情况下Reducer的个数只有一个,即numReduceTasks=1,分区数为1,这时候也就没有必要进行分区操作了(因为反正数据最终都是到同一个Reducer上去,分区的本意就是为了划分数据到不同的Reducer上去的),所以当Reducer的个数为1时(或者默认时),实现方式一重载的getPartition函数就不会被执行,同理实现方式二重载的hashCode()函数也不会被执行。
三、实现分组逻辑
这里也有两种实现方式,实现其一就可以实现目的。
实现方式一:继承(extends)writableComparator 类
实现方式很简单,直接比较复合键的第一个值即可。
public static class FirstGroupingComparator extends WritableComparator{protected FirstGroupingComparator(){super(IntPair.class, true);}@Overridepublic int compare(WritableComparable w1, WritableComparable w2){IntPair key1 = (IntPair) w1;IntPair key2 = (IntPair) w2;int l = key1.getFirst();int r = key2.getFirst();return l == r ? 0 : (l < r ? -1 : 1);}}
这里出现了WritableComparator,上面组合Key继承的是WritableComparable,两者的区别可参考:Java 中 Comparable 和 Comparator 比较
实现方式二:实现(implements)RawComparator 接口
public static class FirstGroupingComparatorimplements RawComparator<IntPair> {@Overridepublic int compare(byte[] b1, int s1, int l1, byte[] b2, int s2, int l2) {return WritableComparator.compareBytes(b1, s1, Integer.SIZE/8,b2, s2, Integer.SIZE/8);}@Overridepublic int compare(IntPair o1, IntPair o2) {int l = o1.getFirst();int r = o2.getFirst();return l == r ? 0 : (l < r ? -1 : 1);}}
这里只要重载两个输入参数不同的compare函数即可。
- 对于第一个compare函数,其直接进行的是字节流上的比较,省去了反序列化的操作,比较效率会高一点,但是也相对难懂了一点,首先查看其在父类的参数的定义说明:
/*** Compare two objects in binary.* b1[s1:l1] is the first object, and b2[s2:l2] is the second object.** @param b1 The first byte array.* @param s1 The position index in b1. The object under comparison's starting index.* @param l1 The length of the object in b1.* @param b2 The second byte array.* @param s2 The position index in b2. The object under comparison's starting index.* @param l2 The length of the object under comparison in b2.* @return An integer result of the comparison.*/public int compare(byte[] b1, int s1, int l1, byte[] b2, int s2, int l2);
其进一步调用了WriteableComparator.compareBytes函数(该函数实现如下)
/** Lexicographic order of binary data. */public static int compareBytes(byte[] b1, int s1, int l1,byte[] b2, int s2, int l2) {return FastByteComparisons.compareTo(b1, s1, l1, b2, s2, l2);}
观察compare函数以及其调用的compareBytes函数,这两者的输入参数的命名都是一样的,所以它们对应的意义也应该一样,而对于传给compareBytes函数的参数 l1 和 l2 只需要设置为Integer.SIZE/8(也就是4个字节的长度,刚好是一个int型数据的字节长度数目,这样就达到了只比较IntPair的 first 部分的值的目的,从而实现分组的逻辑).(不懂)
PS:IntPair在class中依次定义了first和second两个int型变量,这类对象在转换成bytes数组时会依次将first、second转换为字节数据然后顺序拼接起来,因此假设现在有个IntPair变量A,其转换为bytes数组的变量为B,那么B的长度就为8,B中前4个值就对应A.first,B中后4个值就对应A.second。可以使用如下函数输出验证这一想法。
public static int bytes2Int(byte[] b, int start, int len) {int sum = 0;int end = start + len;for (int i = start; i < end; i++) {int n = ((int)b[i]) & 0xff;n <<= (--len) * 8;sum += n;}return sum;}
- 对于第二个compare函数,其直接比较IntPair的第一个值,思路简单,但是有个问题时,这个函数必须重载但是实际上在二次排序中并没有运行该函数,不知道重载了有什么用。
关于以上两种方式的总结
首先,这两种方式要起效通过 job.setGroupingComparatorClass(FirstGroupingComparator.class); 即可。
回顾下GroupingComparator的作用,其在Reducer中被使用,对Key值相同的数据归类成同个组,Key值不同的数组归类到不同的组,而同个组的数据会在一次reduce函数调用中一次性处理,所以其只需要涉及到键值间的比较而不用涉及到键值的序列化等操作。
再回顾上面的两种实现方式,GroupingComparator皆可通过继承writableComparable类也可以通过实现RawComparator接口来实现,而前者writableComparable也是后者RawComparator接口的一个实现,前者相对来说多了键值对的序列化功能,而再进行键值间的比较时,前者需要先反序列化后才可以进行比较,而后者直接在字节数组层面上进行比较,显然后者的效率要高点,所以在实践中如果追求效率的话,用RawComparator实现GroupingComparator效率相对会比较高。
四、实现Mapper
public class MyMapper extends Mapper<LongWritable, Text, IntPair, IntWritable>{//这是一个空串private IntPair key = new IntPair();private IntWritable value = new IntWritable();// map方法的生命周期: 框架每传一行数据就被调用一次protected void map(LongWritable inKey, Text inValue,Context context) throws IOException ,InterruptedException {//直接读入一条的数据做为keyString line = inValue.toString(); // 行数据转换为stringSystem.out.println("line:"+line);String[] words = line.split(" "); // 行数据分隔单词if(words!=null&&words.length>1) {int first = Integer.parseInt(words[0]);int second = Integer.parseInt(words[1]);key.setFirst(first);key.setSecond(second);value.set(second);context.write(key, value);}}}
实现思路很简单,就是读取每一行的数据,得到其中的两个int数据left和right,进一步得到键值对<(left, right), right>。
但是实现起来还是有一点要注意的:Mapper的map函数在实践中会被调用很多次,所以一些能够声明在map函数之外的变量就不要声明在map函数里面,比如这里的private 的int型变量key和value就声明在map函数之外,在map函数调用的过程中它们每一次都设置新的值,而新的值通过context.write函数执行之后这两个变量又可以复用了。而如果声明在map函数里面,则可能会存在频繁地调用map函数处理每一行输入的数据,这个过程中不断地new变量不断地delete变量,效率上有点影响的。
五、实现Reducer
public class MyReducer extends Reducer<IntPair, IntWritable, Text, IntWritable>{// 生命周期:框架每传递进来一个kv 组,reduce方法被调用一次private static final Text SEPARATOR = new Text("------------------------------------------------");private Text first = new Text();@Overrideprotected void reduce(IntPair key, Iterable<IntWritable> values,Context context) throws IOException, InterruptedException {//写入key和空value,重复的key覆盖context.write(SEPARATOR, null);first.set(Integer.toString(key.getFirst()));for (IntWritable value : values) {context.write(first, value);}}}
经过了Mapper的map、分区排序、合并等操作,到达Reducer的时候其实已经是二次排序完成了,所以这里就只需要将数据输出出来即可。
六、启动类
/*** twosort:二次排序* @author suibibk**/public class App {/*** 1. 业务逻辑相关信息通过job对象定义与实现 2. 将绑定好的job提交给集群去运行*/public static void main(String[] args) throws IOException, ClassNotFoundException, InterruptedException {Configuration conf = new Configuration();Job job = Job.getInstance(conf);job.setJarByClass(App.class);job.setMapperClass(MyMapper.class);job.setReducerClass(MyReducer.class);//设置分区和分组job.setPartitionerClass(FirstPartitioner.class);job.setGroupingComparatorClass(FirstGroupingComparator.class);// 设置业务逻辑Mapper类的输出key和value的数据类型job.setMapOutputKeyClass(IntPair.class);job.setMapOutputValueClass(IntWritable.class);job.setOutputKeyClass(Text.class);job.setOutputValueClass(IntWritable.class);// 指定要处理的数据所在的位置FileSystem fs = FileSystem.get(conf);String inputPath = args[0];Path input = new Path(inputPath);if(fs.exists(input)) {FileInputFormat.addInputPath(job, input);}// 指定处理完成之后的结果所保存的位置String outputPath = args[1];Path output = new Path(outputPath);//需要先删除,不然第二次执行会报错if (fs.exists(output)) {fs.delete(output, true);}FileOutputFormat.setOutputPath(job, output);// 向yarn集群提交这个jobboolean res = job.waitForCompletion(true);System.exit(res ? 0 : 1);}}
七、pom.xml
<project xmlns="http://maven.apache.org/POM/4.0.0" xmlns:xsi="http://www.w3.org/2001/XMLSchema-instance" xsi:schemaLocation="http://maven.apache.org/POM/4.0.0 http://maven.apache.org/xsd/maven-4.0.0.xsd"><modelVersion>4.0.0</modelVersion><groupId>com.suibibk</groupId><artifactId>twosort</artifactId><version>0.0.1-SNAPSHOT</version><name>twosort</name><dependencies><dependency><groupId>org.apache.hadoop</groupId><artifactId>hadoop-common</artifactId><version>2.8.5</version></dependency><dependency><groupId>org.apache.hadoop</groupId><artifactId>hadoop-hdfs</artifactId><version>2.8.5</version></dependency><dependency><groupId>org.apache.hadoop</groupId><artifactId>hadoop-mapreduce-client-core</artifactId><version>2.8.5</version></dependency></dependencies><build><finalName>twosort</finalName><plugins><plugin><artifactId>maven-compiler-plugin</artifactId><configuration><source>1.6</source><target>1.6</target></configuration></plugin><plugin><groupId>org.apache.maven.plugins</groupId><artifactId>maven-shade-plugin</artifactId><version>1.4</version><configuration><createDependencyReducedPom>false</createDependencyReducedPom></configuration><executions><execution><!-- 执行package的phase --><phase>package</phase><!-- 为这个phase绑定goal --><goals><goal>shade</goal></goals><configuration><!-- 过滤掉以下文件,不打包 :解决包重复引用导致的打包错误--><filters><filter><artifact>*:*</artifact><excludes><exclude>META-INF/*.SF</exclude><exclude>META-INF/*.DSA</exclude><exclude>META-INF/*.RSA</exclude></excludes></filter></filters><transformers><transformerimplementation="org.apache.maven.plugins.shade.resource.AppendingTransformer"><resource>META-INF/spring.handlers</resource></transformer><!-- 打成可执行的jar包 的主方法入口--><transformerimplementation="org.apache.maven.plugins.shade.resource.ManifestResourceTransformer"><mainClass>com.suibibk.App</mainClass></transformer><transformerimplementation="org.apache.maven.plugins.shade.resource.AppendingTransformer"><resource>META-INF/spring.schemas</resource></transformer></transformers></configuration></execution></executions></plugin></plugins></build></project>
八、打包测试
- maven insatll
- 上传jar到集群
- yarn jar twosort.jar /input/file5.txt /output/
- hdfs dfs -cat /output/part-r-00000
结果如下:
[hadoop@worker1 test]$ hdfs dfs -cat /output/part-r-00000-------------------------------------------------9999 1-9999 5------------------------------------------------1 21 8------------------------------------------------2 72 99------------------------------------------------3 95------------------------------------------------4 134 62------------------------------------------------7 57 8888
参考:https://www.cnblogs.com/linzch3/archive/2018/11/15/9961942.html
